How to install Stable Diffusion for AI image generation (mainly on Windows but applies to other OSes if you squint)

AI Python Stable Diffusion | Tagged
This image was created with Stable Diffusion, some prompts, and a little dash of Photoshop….

AI Art is all the rage at the moment, you don’t want to miss out do you? Follow this guide to be the envy of all your friends. You’ll be generating some weird stuff in no time!

What is Stable Diffusion?

Developed in Python, Stable Diffusion is an open-source AI art generator released on August 22 2020 by Stability AI. Read more about what Stability.ai is doing at thier website.

System Requirements

  • A GPU with at least 6 gigabytes (GB) of VRAM
    • This includes most modern NVIDIA GPUs
  • ~10GB of storage space on your drive 
  • Git version control software
  • The Miniconda3 installer
  • The Stable Diffusion files from GitHub
  • The Latest Checkpoints (v1.4 is the current at the time of writing, 1.5 to be released soon)
  • Windows 8, 10, or 11, Linux and macOS

Step 1 – Software installation

The checkpoint files can be found here:

https://huggingface.co/CompVis/stable-diffusion-v-1-4-original

It’s quite a confusing page at the time of writing, so heres a helpful screen capture of where to get it on the page.

You can download “sd-v1-4.ckpt” or “sd-v1-4-full-ema.ckpt” the latter being quite large!
So grab the first one if you aren’t ready for the ‘full’ experience.

Step 2 – Folder configuration

With everything installed as per the previous section, we now need to set up a few folders on our local computer and unpack the files for Stable Diffusion.

Navigate to your “projects” folder (or similar) on your computer and make a folder called “stable-diffusion.” (eg: c:\projects\stable-diffusion)

In your file manager, open the “stable-diffusion-main.zip” file you downloaded earlier, copy the contents of this ZIP archive into the “stable-diffusion” folder you created earlier.

You should now have a file path similar to the following:

c:\projects\stable-diffusion\stable-diffusion-main

Step 3 – Environment configuration

Select the Start menu and start typing “miniconda3” then select “Anaconda Prompt (miniconda3)”

With this command line terminal open, enter the following commands one at a time.

cd C:\projects\stable-diffusion\stable-diffusion-main

This ensure that you have navigated to your stable-diffusion-main folder. (assumes you have C:\projects as your root path, change this if nessesary)

conda env create -f environment.yaml

This creates the nessesary development environment for you to run Stable Diffusion correctly, this may take a while (depending on your download speed) as some of the files are quite large, be patient.

If you weren’t patient or canceled or paused this process this for any reason, you will need to delete the environment folder, and run the conda env create -f environment.yaml command again. In that case, perform the previous command after deleting the “ldm” folder in “C:Users(Your User Account).condaenvs.”

This can also be an issue if you don’t have enough space on your hard drive (I learnt this the hard way) if so, just delete the failed attempt and start again.

conda activate ldm

This activates the conda ldm, you will need to do this everytime you want to use Stable Diffusion.

mkdir models\ldm\stable-diffusion-v1

This creates a folder to store the checkpoint file you downloaded earlier.

Copy the checkpoint file (sd-v1-4.ckpt) into this new folder. Rename this file as model.ckpt.

Step 4 – Using Stable Diffusion

Open Anaconda Prompt (miniconda3), this will show you a Terminal window, something like the following.

Navigate to C:\projects\stable-diffusion\stable-diffusion-main

Enter the following command into this prompt

conda activate ldm

Then enter the following into the prompt (replacing <YOURPROMPTHERE> with some unique text of your own)

python scripts/txt2img.py --prompt "<YOURPROMPTHERE>" --plms --ckpt sd-v1-4-full-ema.ckpt --skip_grid --n_samples 1

The console window should look similar to the following:

The console window will show a progress indicator as it creates the images, wait for this to complete, then checkout the results!

All images produced by txt2img.py can be found at:

C:\projects\stable-diffusion\stable-diffusion-main\outputs\txt2img-samples\samples

You can even generate a new image from a prompt and an image with the following script.

python scripts/img2img.py --prompt "<YOURPROMPTHERE>" --init-img "inputs/input.png" --strength 0.75 --ckpt sd-v1-4-full-ema.ckpt --skip_grid --n_samples 1

Here’s a few samples I’ve generated with this setup, captions are the prompts I used.

A photorealistic picture of Ironman from Avengers holding a lightsaber in a sword fight with Darth Vader from Star Wars
A photorealistic picture of Ironman from the Avengers in Star Wars as a Jedi
A technical drawing of Ironman from Avengers as the Vitruvian man

This article referenced the following articles in the creation of these instructions.

How to validate a Credit Card Number – The Luhn algorithm (mod 10)

Uncategorized | Tagged

I was reminded today of the “Luhn algorithm” or Mod 10 as it’s sometimes known.

Wikipedia has a pretty solid explanation of it that you can check out below.

https://en.wikipedia.org/wiki/Luhn_algorithm

On that same page is some pseudo code to check if the number being evaluated conforms to mod 10.

function checkLuhn(string purportedCC) {
    int nDigits := length(purportedCC)
    int sum := 0;
    int parity := (nDigits-2)modulus 2 
    for i from 0 to nDigits - 1 {
        int digit := integer(purportedCC[i])
        if i modulus 2 = parity 
            digit := digit × 2 
        if digit > 9 
            digit := digit - 9 
        sum := sum + digit 
    }
    return (sum modulus 10) = 0 
}

I had to use this function in a previous life to validate credit card numbers on a major Australian Banks website! Previous to doing that, I had no idea I could execute on, or even comprehend such a thing, the word “algorithm” sounds scary. But it’s really not that difficult to understand, and is more simple than I prevously imagined a credit card number to be.

This is how you validate a Credit Card Number

Example credit card number

4 0 1 2 8 8 8 8 8 8 8 8 1 8 8 1

Step 1 – Starting at the second last number, at every second number, double the number

4012888888881881
x2x2x2x2x2x2x2x2
8216161616216
For example: as you can see above, 8×2 = 16 etc.

Step 2 – When you double the number, if the result is a two digit number, like 16 in the previous step, then take the two digits of that number, and add them together ie:- take 16, add 1 to 6 ie:- 1+6 = 7

4012888888881881
x2x2x2x2x2x2x2x2
8216161616216
1+61+61+61+61+6
82777727
For example: take 16, add 1 to 6 ie: 16 becomes 1+6 = 7

Step 3 – Take every other number from the top row, and insert them next to the numbers in the previous step.

4012888888881881
x2x2x2x2x2x2x2x2
8216161616216
1+61+61+61+61+6
82777727
8022787878782871
Form example: column two is 0, column four is 2

Step 4 – Add all the digits in the sequence, if the final sum can be evenly divided by 10, then it is a valid credit card number!

8+0+2+2+7+8+7+8+7+8+7+8+2+8+7+1 = 90

Googles new logos, rebrand? or re-bad?

Graphic Design

So by now you’ve probably seen the logo change to the G-Suite of apps.

Some people aren’t happy, and while I can sympathise, and wonder what they were thinking, I think it’s important to articulate why the logos are bad.

For me, it’s all about colour! The shapes themselves are fine, but they are composed of too many colours! Perhaps a less-is-more approach would be in order? Reducing them down to a single colour gives you something like this…

Not entirely terrible now right? But still overly simplified. And at smaller scales, they should ‘read’ better.

One major complaint I have is that it’s hard to distinguish what the logo is when it’s depicted as a Chrome tab like this…

Can you spot which one is Gmail here?

If you nuke the colours of the Gmail logo to just red, you end up with this…

bit more obvious huh?

Having said all of this, perhaps this is just a knee jerk reaction from everyone, we’ve known this logo for such a long time, and now it’s different! Change! Oh no! But not all change should be met with harsh criticism, give it time and maybe it will become second nature to us all.

Perhaps in time we may even learn to enjoy it! 😉

Related articles for reference:-

https://techcrunch.com/2020/10/06/googles-new-logos-are-bad/

https://arstechnica.com/gadgets/2020/10/google-rebrands-g-suite-as-google-workplace-ships-new-multi-colored-icons/

Shuffling the order of an array with Javascript

javascript

In this post, I’ll show you how to shuffle the order of an array in Javascript.

For this example, we will need an array of string values, something like this:

var greeknumbers = new Array();
greeknumbers[0] = "alpha";
greeknumbers[1] = "beta";
greeknumbers[2] = "gamma";
greeknumbers[3] = "delta";
greeknumbers[4] = "epsilon";
greeknumbers[5] = "zeta";
greeknumbers[6] = "omega";
greeknumbers[7] = "sigma";
greeknumbers[8] = "psi";
greeknumbers[9] = "chi";

Next, we will need the following Array.prototype constructor.

Array.prototype.shuffle = function() {
	var len = this.length;
	for (var i = 0; i<len; i++) {
		var rand = Math.floor(Math.random()*len);
		//swap current index with a random one
		var temp = this[i];
		this[i] = this[rand];
		this[rand] = temp;
	}
};

(You can learn more about these at this link on developer.mozilla.org)

If we were to log this array to the console we would see this:

["alpha", "beta", "gamma", "delta", "epsilon", "zeta", "omega", "sigma", "psi", "chi"]

This is listing out the array in it’s initial order.

To shuffle the order of this array, we run the shullfe Array.prototype on our array like this:

greeknumbers.shuffle();

This function returns nothing, but it re-arranges the order of the array. So if we now log the array to the console, we would see something like this:

["delta", "chi", "beta", "gamma", "sigma", "psi", "alpha", "zeta", "epsilon", "omega"]

The arrays order has been re-sorted or shuffled in a random order!

So what is this actually doing? Lets work it out, step by step.

First, we create our Array.prototype constructor:

Array.prototype.shuffle = function() {
};

Next, we create a variable to store the length of the array.

Array.prototype.shuffle = function() {
	var len = this.length;
};

Then, we create a loop over the arrays length

Array.prototype.shuffle = function() {
	var len = this.length;
	for (var i = 0; i<len; i++) {		
	}
};

Then, inside this loop, we create a variable to store a random number according to the the arrays length

Array.prototype.shuffle = function() {
	var len = this.length;
	for (var i = 0; i<len; i++) {
		var rand = Math.floor(Math.random()*len);		
	}
};

To explain what this on line is doing, I will start from the inner-most statements. Math.random() will generate a random number, as developers.mozilla.org puts it:

The Math.random() function returns a floating-point, pseudo-random number in the range 0–1 (inclusive of 0, but not 1) with approximately uniform distribution over that range — which you can then scale to your desired range. The implementation selects the initial seed to the random number generation algorithm; it cannot be chosen or reset by the user.

Source https://developer.mozilla.org/en-US/docs/Web/JavaScript/Reference/Global_Objects/Math/random.

Then we multiply the returned random number by the length of the array, this is to ensure that we get a number within the range of our arrays length.

Math.random will return a floating point number, which we don’t want, so we wrap that in a Math.floor call, which will return an integer.

If we were to log tihs the console, our code at this point would return something like the following:

9
0
3
6
5
9
5
2
6
2

OK, so the next thing we do, is to swap the items in the array with the random number we have found in the previous line.

Array.prototype.shuffle = function() {
	var len = this.length;
	for (var i = 0; i<len; i++) {
		var rand = Math.floor(Math.random()*len);
		//swap current index with a random one
		var temp = this[i];
		this[i] = this[rand];
		this[rand] = temp;
	}
};

And that’s it! If you found this code useful, please leave a comment!

Display a random word in a list of words using Javascript

javascript

Ever have a list of values and you want to pick a random item in the list?

Here’s how I would do this.

First, we start with our random number function, as follows:

function randomNum(minVal, maxVal) {
	do {
		r = Math.random();
	} while (r == 1);
	return minVal+Math.floor(r*(maxVal+1-minVal));
}

The randomNum function, accepts two arguments, minimum value (minVal) and a maximum value (maxVal),  these will be the lowest number and the highest number in your range of numbers, it returns a random number between the two numbers passed to it.

So lets say you have an array of words, something like this:

var greeknumbers = new Array();
greeknumbers[0] = "alpha";
greeknumbers[1] = "beta";
greeknumbers[2] = "gamma";
greeknumbers[3] = "delta";
greeknumbers[4] = "epsilon";
greeknumbers[5] = "zeta";
greeknumbers[6] = "omega";
greeknumbers[7] = "sigma";
greeknumbers[8] = "psi";
greeknumbers[9] = "chi";

If we wanted to get a random item from this list, we would do the following:

console.log(greeknumbers[randomNum(0, greeknumbers.length)]);

Lets break-down what this is doing, starting from the inside.

The randomNum function is being executed, and has zero (0) passed into it as the minVal, and the length of our array as the maxVal (in this case, it would be 10).

randomNum(0, greeknumbers.length);

If we were to execute this in our console, we would see a random number in between 0 and 10.

To refer to a specific item in our array, we can refer to a specific array index:

greeknumbers[0]; //this will return "alpha", the first item in our array.

So in our above example, all we are doing is passing a random number to our array, which in turn displays the random value at that array index!

Try it yourself, or you can download an example of this here: random-words-in-a-list.js.

I hope this was helpful to you, let me know if you have any other ways of doing this, I’d be curious to know!

Creating a simple Tic-Tac-Toe (or Naughts and Crosses) game in Javascript and jQuery

css html javascript jquery

In this tutorial, I will show you how to create a Tic Tac Toe game using Javascript and jQuery.

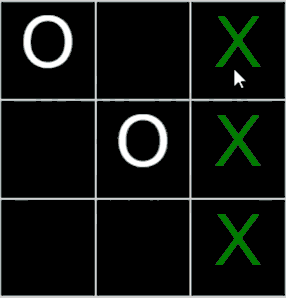
When we are complete, it will look something like the following:


I’ll explain how I did this, step by step, so that you can create a Tic Tac Toes game too!

If you’re time poor, and just want to skip to the facts, I got you, use the links below to skip to the relevant part for you, or read on to continue.

Lets go!

The concept, how does the game work?

The first thing to think about is the layout of the game as HTML. I’ve seen other examples on the web using a table to layout the ‘panels’ (as I called them) of the game. And while it’s a relatively straightforward way to visualise the game, its not really necessary, and its actually a problem to try and understand the games logic.

Instead, this example will use a linear sequence of “panels”, floated left within a fixed width container to simulate the appearance of a game grid. This will then enable us to conceptualise the games options in a linear way. If this doesn’t make sense right away, stick with me, it will eventually.

So, with that in mind, lets work out all the possible winning combinations.

As we can see, there are 8 possible winning combinations, pretty straightforward so far.
back to top

Create the necessary files

Now that we understand how the game works, lets create all the files we will need for our game.

File name Description
game.htm The HMTL file that contains most of the content of the game.
css/game.css All css styles are contained within this file.
js/jquery.js The javascript library that game.js refers to.
js/game.js The main javascript file, contains most of the code for the functionality of the game.

Lets break down what these files actually do.
back to top

Creating the HTML elements of the game (game.htm)

The first thing we want to do, us to create our standard HTML markup, linking in our jQuery library, our game.js Javascript file and our game.css stylesheet file. We also need to create a container to store all the required elements of our game (we will call this our “game-container“):

<!DOCTYPE HTML>
<html>
<head>
<meta http-equiv="Content-Type" content="text/html; charset=utf-8">
<title>TIC TAC TOE - Adam Lemmo</title>
<script type="text/javascript" src="js/jquery.js"></script>
<script type="text/javascript" src="js/game.js"></script>
<link href="css/game.css" rel="stylesheet"/>
</head>
<body>
	<div id="game-container">
	</div>
</body>
</html>

Within the “game-container“, we will create an introduction message, that will also contain our character selections, like this:

<div id="game-container">
  <div id="introduction">
    <h1>TIC TAC TOE</h1>
    <p>Try to beat the computer!</p>
    <p>Select your character:</p>
    <form id="character-selections">
      <input type="radio" id="X" name="selections" value="X" checked="yes"/>
      <label for="X">X</label>
      <input type="radio" id="O" name="selections" value="O"/>
      <label for="O">O</label>
    </form>
    <a href="#" id="startBtn">Start game</a>
  </div>
</div>	

Next, we will add our game panels (the actual Tic Tac Toe board), and a “Feedback” screen (to display Game Over man!) and finally, a score element, to track the players score:

<div id="game-container">
  <div id="introduction">
    <h1>TIC TAC TOE</h1>
    <p>Try to beat the computer!</p>
    <p>Select your character:</p>
    <form id="character-selections">
      <input type="radio" id="X" name="selections" value="X" checked="yes"/>
      <label for="X">X</label>
      <input type="radio" id="O" name="selections" value="O"/>
      <label for="O">O</label>
    </form>
    <a href="#" id="startBtn">Start game</a> </div>
	<div id="game-area">
		<a href="#" class="panel"></a>
		<a href="#" class="panel"></a>
		<a href="#" class="panel"></a>
		<a href="#" class="panel"></a>
		<a href="#" class="panel"></a>
		<a href="#" class="panel"></a>
		<a href="#" class="panel"></a>
		<a href="#" class="panel"></a>
		<a href="#" class="panel"></a>
	</div>
  <div id="feedback">
    <h1>GAME OVER</h1>
    <p></p>
    <a href="#" id="startAgainBtn">Start again</a> </div>
</div>
</div>
<div class="container">
  <div id="score">
    <p>Score: 0</p>
  </div>
</div>

As you can see here, we have also created the player selections (X or O) and the startBtn button, which will as it suggests, start our game!

If you have followed this far, the complete HTML file should look as follows:

<!DOCTYPE HTML>
<html>
<head>
<meta http-equiv="Content-Type" content="text/html; charset=utf-8">
<title>TIC TAC TOE - Adam Lemmo</title>
<script type="text/javascript" src="js/jquery.js"></script>
<script type="text/javascript" src="js/game.js"></script>
<link href="css/game.css" rel="stylesheet"/>
</head>

<body>
<div id="game-container">
  <div id="introduction">
    <h1>TIC TAC TOE</h1>
    <p>Try to beat the computer!</p>
    <p>Select your character:</p>
    <form id="character-selections">
      <input type="radio" id="X" name="selections" value="X" checked="yes"/>
      <label for="X">X</label>
      <input type="radio" id="O" name="selections" value="O"/>
      <label for="O">O</label>
    </form>
    <a href="#" id="startBtn">Start game</a> </div>
	<div id="game-area">
		<a href="#" class="panel"></a>
		<a href="#" class="panel"></a>
		<a href="#" class="panel"></a>
		<a href="#" class="panel"></a>
		<a href="#" class="panel"></a>
		<a href="#" class="panel"></a>
		<a href="#" class="panel"></a>
		<a href="#" class="panel"></a>
		<a href="#" class="panel"></a>
	</div>
  <div id="feedback">
    <h1>GAME OVER</h1>
    <p></p>
    <a href="#" id="startAgainBtn">Start again</a> </div>
</div>
</div>
<div class="container">
  <div id="score">
    <p>Score: 0</p>
  </div>
</div>
</body>
</html>

Now that we have our HTML sorted, lets get stuck into writing the Javascript code of our game.
back to top

The Javascript functions of the game (game.js)

The Javascript of the game has four custom functions:

Function Description
startGame() This function as it states, starts the game, it is triggered from the startBtn link.
selectPanel() This function is triggered from the panels in the layout of the game, it is a central function to the game, and represents the users actions in the game.
computerMove() This function represents the actions of the computer, and it follows the order of the aiOrder[] array.
checkCombination() This function is the most generic function in the code, but also the most complex, it checks the users and computers progress in the game, and compares it to the list of valid combinations in the game rules. This function also determines the completion of the game, whether it’s the user or the computer that wins, or if a draw, or ‘tie’ is encountered.

back to top

Initialising the game

The first thing we do, is to initialise some variables that will be used in our game:

//player characters, can be changed if needed...
var userChar = "X";
var computerChar = "O";
var gameOver = false;//gets set to the true when the game is over.
var scoreCount = 0;//set to zero initially, increments by 1 for every winning game.

And now we want to create and store the winning combinations of the game.

Rererring to our earlier breakdown of the winning combinations, we can represent as a linear sequence, in the following way:

We can then use this representation of the winning combinations as a series of arrays:

//all the possible ways to win/winning combinations...
var row1 = [1, 2, 3];
var row2 = [4, 5, 6];
var row3 = [7, 8, 9];
var col1 = [1, 4, 7];
var col2 = [2, 5, 8];
var col3 = [3, 6, 9];
var diag1 = [1, 5, 9];
var diag2 = [3, 5, 7];
//collect all winning combinations...
var rules = [row1, row2, row3, col1, col2, col3, diag1, diag2];
//
var aiOrder = [4, 0, 8, 5, 1, 7, 2, 6, 3];//an array to store the order of the computers turns...

Now that we have all of our variables initialised, we can now focus on initialising the screen.

Because we are using jQuery, we will use the $(document).ready() function:

$(document).ready(function() {//when the document is ready/loaded...	
	$("#game-area").hide();
	$("#score p").hide();
        $("#feedback").hide();
        //
	$("#introduction #startBtn").bind("click", startGame);
	$("#game-area .panel").each(function(i){//apply an id to all the panels...
		$(this).addClass("enabled").attr("id", "panel"+i);
	});
	$("#game-area .panel.enabled").bind("click", selectPanel);//apply a click event to all the panels...
	//
	//the click event for the start again button within the feedback div.
	$("#feedback #startAgainBtn").click(function(){
		$(this).parent().fadeOut();//hide thefeedback div once selected..
		$("#game-area .panel").empty().bind("click", selectPanel).css({"cursor":"pointer"}).removeClass("winner").addClass("enabled");//reset the games state to start again...
		gameOver = false;
	});
});

As you can see, this will hide the game area, the score, and the feedback.

It also binds the startGame function to the #startBtn button, loops over all the panels, and gives them an id, and assigns a click event to the #startAgainBtn button, for when the game is complete.
back to top

The startGame() function

This function is executed when the player selects the #startBtn button in the #introduction screen.

The startGame() function checks which character the player selected, fades the introduction screen out, and shows the score.

function startGame(){	
	$(this).parent().fadeOut();//hide thefeedback div once selected..	
	$("#game-area").fadeIn();
	if($('input[name=selections]:checked', '#character-selections').val() === "X"){
		userChar = "X";
		computerChar = "O";
	} else {
		userChar = "O";
		computerChar = "X";
	}
	$("#score p").show();		
}

back to top

The selectPanel() function

This function is executed when the player selects one of the panels.

Once this is done, the panel is disabled (using the jQuery unbind method to remove the click event).

It also loops over the rules (a collection of the winning combination arrays) and runs the checkCombination() function, passing in the rules iterator to check all combinations.

function selectPanel(e){//invoked when the panel is selected, in this case, from a click event...	
	//this panel has it's click event removed, it's cursor set to default and it's no longer enabled, so this class is removed...
	$(this).text(userChar).unbind("click").css({"cursor":"default"}).removeClass("enabled");
	//loop over all of our rules...
	for (var i = 0;i<rules.length;i++){
		checkCombination(rules[i], userChar);//and execute our function to check all the combinations...
	}
	if(!gameOver){//if it isnt game over, then let the computer have a turn.
		computerMove();//the computers turn is executed with this function.
	}
	//
	e.preventDefault();//prevent the default behaviour of the a tag selected.
}

The last thing this function does, is to check if the game isn’t over, by checking the gameOver variable. The gameOver variable is set by the previously mentioned checkCombination() function.

if the game isn’t over  (gameOver is false), then the computerMove() function is executed.
back to top

The computerMove() function

This function executes when the game isn’t over. It loops over the aiOrder array, checks to see if the panel referred to in the loop is empty (“”) and if so, it applies the computer character to the panel.

function computerMove() {	
	for (var i = 0;i<aiOrder.length;i++){//loop over the order array...
		if($("#game-area #panel"+aiOrder[i]).text()=== ""){//if the panel selected in this loop is empty...
			//...then apply the computers character to the panel, take away its click event, set the cursor to default, and remove the enabled class...
			$("#game-area #panel"+aiOrder[i]).text(computerChar).unbind("click").css({"cursor":"default"}).removeClass("enabled");
			break;//stop further execution of the outer loop.
		}
	}
	for (var j = 0;j<rules.length;j++){
		checkCombination(rules[j], computerChar);//check the combinations of the computer player...
	}
}

The function then loops over the rules array, and executes the checkCombination() function.
back to top

The checkCombination() function

This function checks all of the panels to see if there are any winning combinations, updates the score and checks if the game is a tie game.

Check the comments in the following code, for a step by step breakdown of this function:

//generic function to check either players progress in the game...
function checkCombination(arr, playerChar){	
	var correctNum = 0;//stores the correct number selected by the player.
	var panelCount = 0;//stores the panel count selected.
	var thisNum;//refers to the current number selected
	$("#game-area .panel").each(function(i){//iterate over the panels...
		thisNum = (i+1);//increment our thisNum var, it's 0 based.
		if($("#game-area .panel").eq(i).text() === playerChar){//check if the current panel has the players char in it.
			for (var j = 0;j<arr.length;j++){//loop over the length of the array passed into this function...
				if(thisNum === arr[j]){//check this num against the passed in array...
					correctNum += 1;//test is true, we are correct, increment our correctnum var.
				}
			}
		}
	});
	if(correctNum === arr.length){//if correct num is equal to the arrays length, we are all correct	!		
		$("#feedback").fadeIn().children("p").text('"'+playerChar+'"'+' has won!');//show the feedback message, indicating which player has won!
		$("#game-area .panel.enabled").unbind("click").css({"cursor":"default"}).removeClass("enabled");//disable all the panels, game is over!
		for (var k = 0;k<arr.length;k++){//loop over the winning array found...
			$("#game-area #panel"+(arr[k]-1)).addClass("winner");//add a class to the winning panels! 
		}
		scoreCount +=1;
		$("#score p").text("Score: "+scoreCount);
		gameOver = true;		
	}	
	//determine if game is a tie...
	$("#game-area .panel").each(function(){//loop over all the panels...
		if($(this).text()!==""){//check if the current iterator of the loop is not an empty string...
			panelCount+= 1;//add to our panel count.
		}		
	});//show the feedback indicating game is a tie...
	if(panelCount === $("#game-area .panel").length){//if panel count indicates that all panels are filled, then...
		$("#feedback").fadeIn().children("p").text("Game is a tie!");//show the message that the game is a tie!
	}
}

back to top

The CSS of the game (game.css)

Most of the games CSS is contained within a single rule called #game-container. With the exception of the score, which is separate to the major elements of the game.

If you were to include this on your own page, you would need to wrap it all in another container, and because a combination of relative and absolute positioning is used, it should work reasonably well within another context.

Feel free to modify this to your own designs!

Conclusion

All going well, you should have a complete Tic Tac Toe game written in Javscript/jQuery!

References

The following sites were used as references and inspiration for this game.

File name Description
Javascript Kit – Tic Tac Toe credit: Cory Fogliani  This page gave me insight into the rules of the computer player/AI, I was a bit disappointed with the repetitious code however, so I made my logic loop through the rules instead.
Compare array in Javascript on Stackoverflow  Compare array in javascript
How to know if two arrays have the same-values on Stackoverflow  How to know if two arrays have the same values
Javascript array comparison by vikasrao  JavaScript – Common Array operations

I hope you enjoyed this tutorial, please let me know in the comments if you have any observations on this post!

You can download a complete .zip file of the game here lemmoscripts-tic-tac-toe.
back to top

Adding a timecode in After Effects using an Expression

After Effects After Effects Expressions javascript

In this tutorial, I will show you how to create a customisable timecode/timeline counter using an After Effects Expression. Specifically, something like the following:

If you’re time poor, and just want to skip to the facts, I got you, use the links below to skip to the relevant part for you, or read on to continue.

References

I’ve seen a few videos on YouTube about this topic, and while they are all fine, they just weren’t what I wanted for a video I am currently creating.

Most people were talking about the Timecode Video Effect, which is built-in to After Effects, but that doesn’t allow you to change the font.

Or another example was using an Expression to count, which DID allow you to customise the font, but it didn’t count up based on the current time.

And it’s also possible to do this in Premiere as well, but I really wanted to give it a go in AE, as it’s better for doing animated stuff.

Here’s two example videos that I consulted for some inspiration, but ultimately gave up on as they didn’t meet my unique requirements! 😛

I also consulted an old Creative Cow page, that had an example of an “Expression for Digital 24 Hours clock“. This was a good start, but I wanted to add some more to it to suit my particular requirements.

And finally, I consulted this Adobe page, as it had some code references, if you want to do more with Expressions in After Effects, check this page out.

Ultimately, my goal was to create an old VHS time code effect, something like this…

(Check out this video for some more VHS nostalgia feels)

Read on to see how to do this!

back to top

Step 1 – Creating your After Effects Project

Open After Effects, I’m using the latest version at the time of this post (After Effects CC 2018) but this should work in earlier versions.

Select “New Composition

Update the settings in the Composition Setting dialog to suit your needs, I have a specific width, height, frame rate and duration, but yours may vary (I made the duration go for an hour just to prove the point of this functionality, but it’s not necessary).


back to top

Step 2 – Adding the text layer

With your composition created, create a text layer by selecting “Layer” > “New” > “Text“.

Open the “Character” panel from the right of the After Effects window, and select your chosen font and style, I selected a custom Commodore 64 font, and made it reasonably large and centered it on the composition.

I also typed some numbers on the text layer just to see it, this isnt important, as it will get overwritten, but if you need a handle to grab onto, this is a way to do it.


back to top

Step 3 – Adding the expression

Go to the “Effects & Presets” panel, and under “Expression Controls“, select “Slider Control“, and drag it to your text layer.

Expand the “Text” layer, then the “Text” property of the layer, the “Effects” property, and then the “Slider Control“, it should look as follows:

Then click and hold down your left mouse button on the “Pick Whip” icon on the “Source Text” stop watch, and drag it to the “Slider” stop watch in the “Slider Control” effect, refer to the following:

You will notice that the number on your text layer has changed, that’s because the “Source Text” of the text layer, is being controlled by the “Slider Control“.

Next, select “Expression: Source Text” under the “Source Text” stop watch, and then select and delete the default expression (use CTRL/CMD + A to make sure it’s empty)

Replace it with the following:

function pad(str, max) {
	str = str.toString();
	return str.length < max ? pad("0" + str, max) : str;
}

function digits(myVal, myNumDigits, myPad) {
	var s = myVal.toString();
	while (s.length < myNumDigits) s = '0' + s;	
	return pad(Math.floor(s), myPad);
}

hr = digits(time / 3600, 1, 1);
min = digits(time % 3600 / 60, 2, 2);
sec = digits(time % 60, 2, 2);

"SLP " + hr + ":" + min + ":" + sec;

If all goes well, your composition should look as follows:

Grab the Time scrubber and skip ahead a few frames, the text on the text layer should change to reflect the current time in the composition!

If all goes well, your composition should look as follows…


back to top

Step 4 – The Expression explained

Here’s an explanation of the Expression.

The “pad” and “digits” functions are string formatting functions.

function pad(str, max) {
	str = str.toString();
	return str.length & lt;
	max ? pad("0" + str, max) : str;
}

The “pad” function, adds 0 (zero) to the left of one of the time numbers when it is called, that’s its only purpose.

Next is the digits function:

function digits(myVal, myNumDigits, myPad) {
	var s = myVal.toString();
	while (s.length & lt; myNumDigits) s = '0' + s;
	return pad(Math.floor(s), myPad);
}

The “digits” function formats the values (myVal, myNumDigits and myPad) passed to it. It uses a while loop to restrict the number of digits to the specified  amount passed to it.

This function also calls the “pad” function when returning the Math.floor’d value of the passed time number, and passes on the specified pad amount as well.

The next three lines are variables that store the hours, minutes and seconds values.

hr = digits(time / 3600, 1, 1);
min = digits(time % 3600 / 60, 2, 2);
sec = digits(time % 60, 2, 2);

These variables call the digits function in three different ways, by passing in the “time” value (an AE constant of sorts), performs simple calculations on the time number to get the hours, minutes and seconds, then restricts the numbers to 1 digit for hours, 2 digits for minutes, and 2 digits for seconds. The last passed parameter is the amount of pad required, because our VHS example only has 1 digit required for hours, (most likely because VHS tapes didn’t go past 9 hours? who knows, that’s the retro format).

The last line in the Expression, concatenates the previous variables together, and gets displayed in the Composition (the SLP and colon : characters, complete the effect).

"SLP " + hr + ":" + min + ":" + sec;

back to top

Step 5 – Customising the Expression

To customise the Expression, it all depends on the types of things you want to do.

You can remove the SLP and colon characters from the string by replacing the above with this:

hr + min + sec;

Or you could add something different around the time values.

"The time is " + hr + "|" + min + "|" + sec;

The possibilities are endless.
back to top

Conclusion

And that brings us to the end of this tutorial!

If you want the .aep file for this project, you can download it here:

I hope this was informative, and you can make amazing retro VHS videos to your hearts content!

Creating a PHP Class to query a database table

php

In this post, I am going to show you a technique to query a database and return results, but instead of doing that directly on the page you want to display the results, all in one go, I will show you how you can do this with a PHP Class, so that you can keep your queries separate from the display of your data.

This post is a bit long, so use the links below to skip to the relevant part for you, or read on to continue.

This is useful for code re-use, being more efficient and also making it easier to read your code and have a nice structure to your PHP and HTML.

I’ve found in the past, if you put everything on the one page, it can quickly get out of hand, and make it difficult to edit your pages without breaking either the HTML, or the PHP functionality, this technique attempts to limit these kinds of dramas.

You should have a basic working knowledge of HTML and PHP to complete this example.

Step 1 – The PHP Class

The first thing you will need to setup, is your PHP Class.  This will be unique to your own setup (such as host, db-name, username and password etc.)

See the following:

<?php
	class myData {
		protected $connection = null;

		public function connect() {
			$this->connection = new PDO("mysql:host=localhost;dbname=your-db-name", "db-user-name", "db-user-password");
		}
		public function getData() {
			$query = $this->connection->prepare('SELECT * FROM `my-db-table`;');
			$query->execute();

			return $query;
		}		
	}
?>

(Edit the values “your-db-name“, “db-user-name“, “db-user-password” to match the equivalent on your own site.)

The connect method, does exactly that, it connects to your database. This method uses “PDO” to do the query, but you may choose to use another function, so long as it queries your database. You can read more about PDO here.

Next is the “getData” method. This method runs a query based on our previous connection when it is executed on your database table and returns the result of the query.

Copy this code, and save it as “myData.php” or similar.

Pretty simple huh? Now with our Class setup, we can call this functionality on an HTML page that we want to display our results on.
back to top

Step 2 – Displaying the query result on a page

Step 2.1 – Creating an instance of the PHP Class on your page

Next, we need to create our display page.

<?php
	require 'myData.php';

	$myData = new myData();
	$myData->connect();

	$theDataIwant = $myData->getData();
?>

The first line adds our previously created “myData.php” Class to the page.

The second and third lines create an instance of our Class on the page and then executes the “connect” method of our class.

The the last line above, creates a variable (“theDataIwant“) to store a variable with the result of calling the “getData” method of our Class.

Copy and paste the previous code to the top of a page called “results.php” or similar.
back to top

Step 2.2 – The HTML page

Add your HTML structure to the page, as the following:

<!doctype html>
<html>
<head>
	<meta charset="utf-8">
	<title>Get my data</title>
</head>

<body>
<!-- Your PHP code goes here -->
</body>
</html>

This just creates a standard HTML5 style HTML document to the page.
back to top

Step 2.3 – The PHP to display the results to the page

At the HTML comment in the previous section (“<!– Your PHP code goes here –>“) add the following PHP code.

	<?php
	foreach ( $theDataIwant as $key => $myReturnedData ) {
		echo $key . " - " . $myReturnedData['name']; 
	}
	?>

The above PHP is a foreach loop, that iterates over “theDataIwant” variable we created earlier, and displays it to the page with the “echo” statement in the loop, it will display the “name” field of every row in your table.

This result should look something like this:

1 – Adam
2 – Steve
3 – Jeff
4 – <other names>
etc.

If all goes well, you should have successfully queried your database with a PHP Class!
back to top

Bonus beats

You can extend this Class to do various things other than just merely querying the database for all your data, you can create a sorting method or create a method that looks for a particular field in your table.


Get numbers from strings in Javascript

javascript

Here’s a small javascript utility function to get numbers from strings.

String.prototype.getNum = function() {
	thisNum = '';
	for (var i = 0; i<this.length; i++) {
		myChar = this.charAt(i);
		if (!isNaN(myChar)) {
			thisNum += myChar;
		}
	}
	return thisNum;
};

This is how you use it.

var myString = "this is number 67890";
console.log(myString.getNum());  //returns 67890

Hope this helps! 🙂

Replace strings with other strings in Javascript

javascript

Here’s a small javascript replace utility function that has been useful to me in the past.

String.prototype.replace = function(strReplaced,strReplacedWith) {
	return this.split(strReplaced).join(strReplacedWith);
}

Here’s an explanation of how to use it in your own scripts.

myString.replace("replace this","with this");

If your string has line breaks, use the following…

myString.replace("\r","<br/>"); //and reverse when displaying in text areas

Hope you find this useful! 🙂