Recently I had the need to create a local development environment for my WordPress blog, so I consulted Google, and found a mix of resources that helped me.
This post is a bit long, so use the links below to skip to the relevant part for you, or read on to continue.
- Step 1 – Copy your site files from your remote webhost
- Step 2 – Get the WordPress database from your Live site using PhpMyAdmin
- Step 3 – Import your database to your Localhost
- Step 4 – Connect your database to your Local instance of WordPress
- Bonus Drama – “Upload folder is not writable” or images wont upload
The first site I found was Copying a Live WordPress Site to a Localhost which is very comprehensive, but a little dated and a little too specific for my needs in some areas. Check it out if you’re interested.
I also had a weird issue when I eventually got WordPress working on my Localhost where the media upload functionality stopped working. I found this page, How to Fix: ‘Upload folder is not writable’ WordPress, which resolved the issue for me.
back to top
Step 1 — Copy your site files from your remote webhost
I wont go into too much detail here, suffice it to say, that you need to copy all of the WordPress installation files to your local machine, I have a mapped site in Dreamweaver setup that connects via FTP to my webhost, and I just downloaded all the site files to my computer, easy. It might take a while given your connection speed, and the size of your WordPress instance, plug-ins and themes etc. So while you wait, you can do the next step, just make sure it finishes correctly.
back to top
Step 2 — Get the WordPress database from your Live site using PhpMyAdmin
First, work out how to find your instance of PhpMyAdmin on your live site.
Once you’re there, follow these steps:
- On the left hand side of PhpMyAdmin, select your database, mine is called “gigazara_wp1” yours will be different.
- Then select the “Export” tab from the top of the screen.
- Then select the “Go” button.
Here’s a pic for reference:
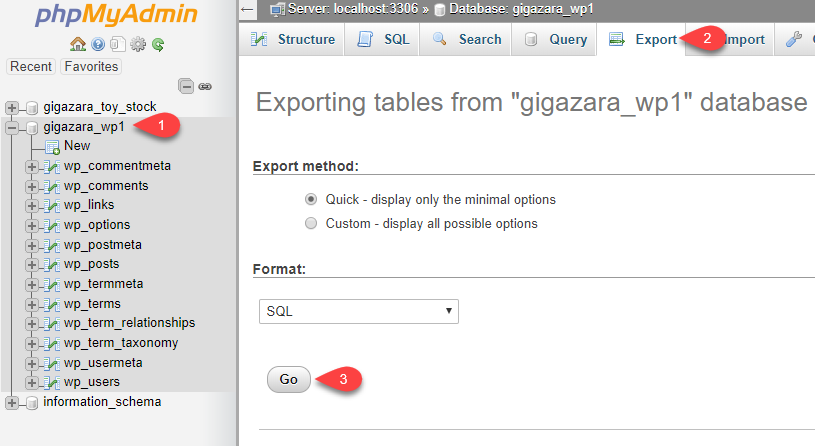
Exporting your WordPress database in PhpMyAdminThis should then download the file to your computer (mine is “gigazara_wp1.sql“).
This file is just a series of SQL queries in a text file, make sure you know where this is, you will be using it in the next step.
back to top
Step 3 — Import your database to your Localhost
I use the excellent, bare-bones and ultra-configurable Uniserver as a local WAMP stack, but you can use anything, I’ve heard WAMP, MAMP, XAMPP are all pretty good alternatives, call me nostalgic, but Uniserver works pretty well for me.
So, ensure that your WAMP stack is running, Apache, MySQL and PHP.
This is how it looks in Uniserver.
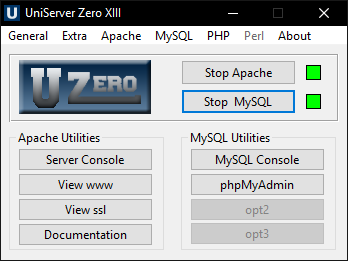
Then jump into phpMyAdmin and follow these steps:
- On the left hand side of PhpMyAdmin, select your database, mine is called “gigazara_wp1” yours will be different.
- Then select the “Import” tab from the top of the screen.
- Select the “Choose file” button, local your .sql file (for me it is “gigazara_wp1.sql“)
- I don’t select anything else here, just select the “Go” button.
Here’s a pic for reference:
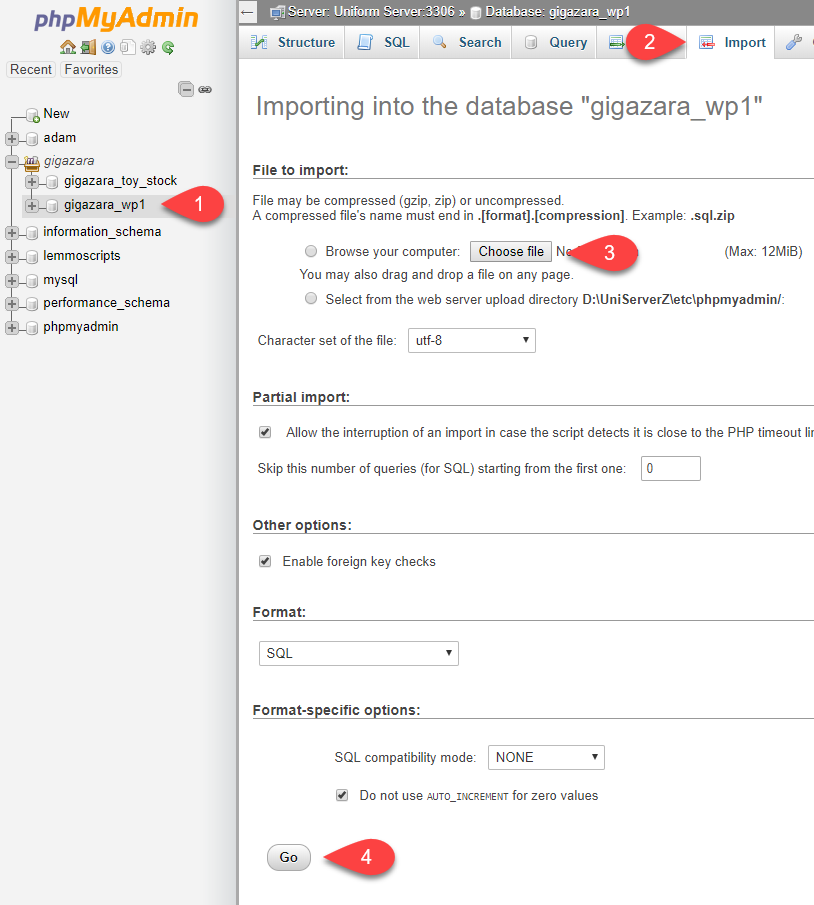
Importing your WordPress database in PhpMyAdminThis should then upload the database to your local database!
back to top
Step 4 — Connect your database to your Local instance of WordPress
OK, so your database is there, but WordPress doesn’t know it yet, you need to connect it so that it can reference it.
Follow these steps:
- On the left hand side of PhpMyAdmin, select your database.
- Then select the “SQL” tab from the top of the screen.
Here’s a pic for reference:
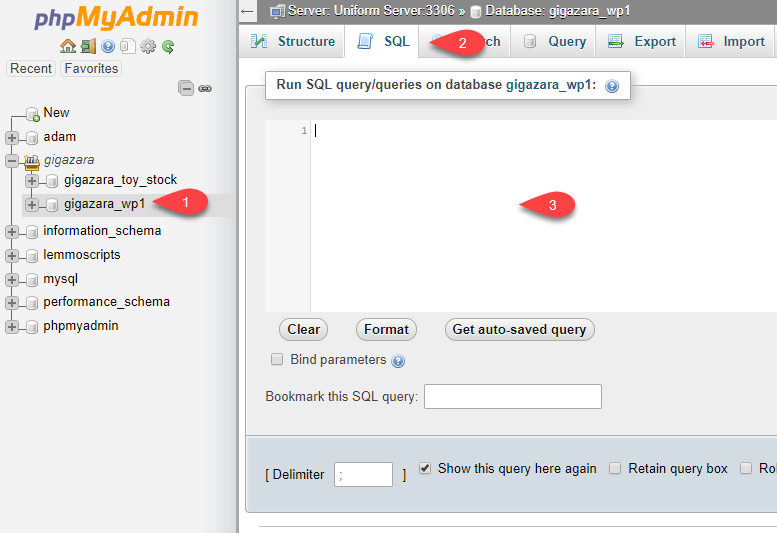
The SQL tab of PhpMyAdmin3. In the text area highlighted above, enter the following SQL query:
UPDATE wp_options SET option_value = replace(option_value, 'http://www.gigazarak.com/blog', 'http://localhost/gigazarak/blog') WHERE option_name = 'home' OR option_name = 'siteurl';
UPDATE wp_posts SET post_content = replace(post_content, 'http://www.gigazarak.com/blog', 'http://localhost/gigazarak/blog');
UPDATE wp_postmeta SET meta_value = replace(meta_value,'http://www.gigazarak.com/blog', 'http://localhost/gigazarak/blog');
UPDATE wp_posts SET guid = REPLACE (guid, 'http://www.gigazarak.com/blog', 'http://localhost/gigazarak/blog');
Replace the URLs in the query to match your remote and local site URLs, I’ve bolded them above for your reference.
Step 5 — Update the wp-config.php file
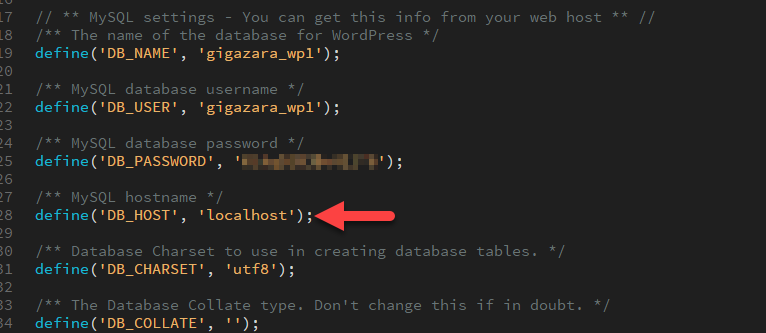
Find the “wp-admin.php” file on your local machine, open it in your text editor of choice and alter the following lines to refer to your localhosts information etc, as per the following:
Just make sure that the “DB_HOST” is set to whatever you have named your localhost, (mine is just set to the default “localhost“, but you may have something different here).
back to top
Bonus drama – “Upload folder is not writable” or images wont upload
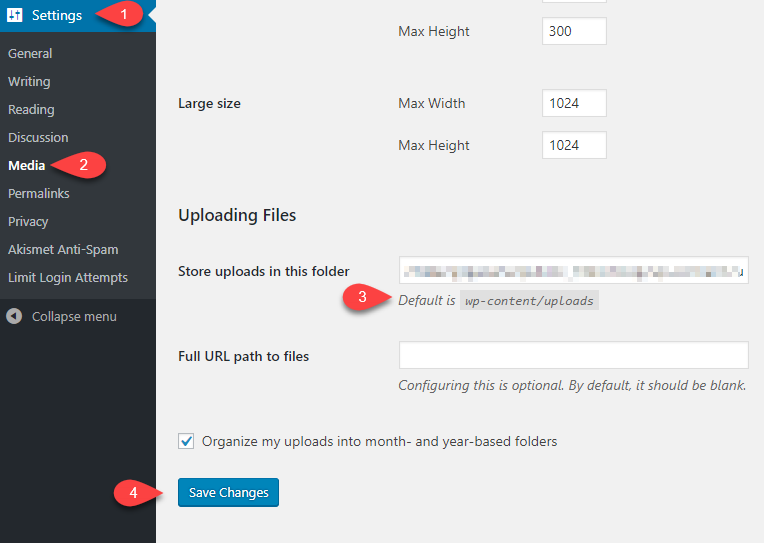
Go to your WordPress admin, and follow these steps
- Click on “Settings”
- Click on “Media”
- Look for the “Upload Files Section”
- Set “Store uploads in this folder” to the default “wp-content/uploads” (without quotes)
- Select the “Save Changes” button.
Here’s a pic for reference:
Uploads should now work, with any luck!
That brings us to the end of this post, I hope it was helpful! 🙂
back to top